How to Prepare Artwork for Custom Printed Pouches
Learn how to prepare artwork files for custom printed pouches, including size, bleed, color mode, text, barcode and printing checks.
Published: 2025-07-01 | Updated: 2026-05-21
Why Artwork Quality Affects Quotation and Lead Time
The artwork file is the starting point for every custom printed packaging order. If the artwork is not prepared correctly, it can cause delays before cylinder engraving, incorrect print dimensions, missing bleed, color mismatches, blurry text, barcode scanning failures, and costly rework. A well-prepared artwork file reduces prepress time, avoids engraving errors, and keeps the production schedule on track.
File Formats, Fonts and Vector Requirements
Accepted file formats include AI (Adobe Illustrator), PDF, PSD (Photoshop), and CDR (CorelDRAW). All text must be converted to outlines (curves) before submission — if fonts are not outlined, the prepress system may substitute them, causing unexpected font changes. Use vector graphics wherever possible for logos and design elements to maintain sharpness at any print size. Raster images embedded in the design should be at least 300 dpi at actual print size.
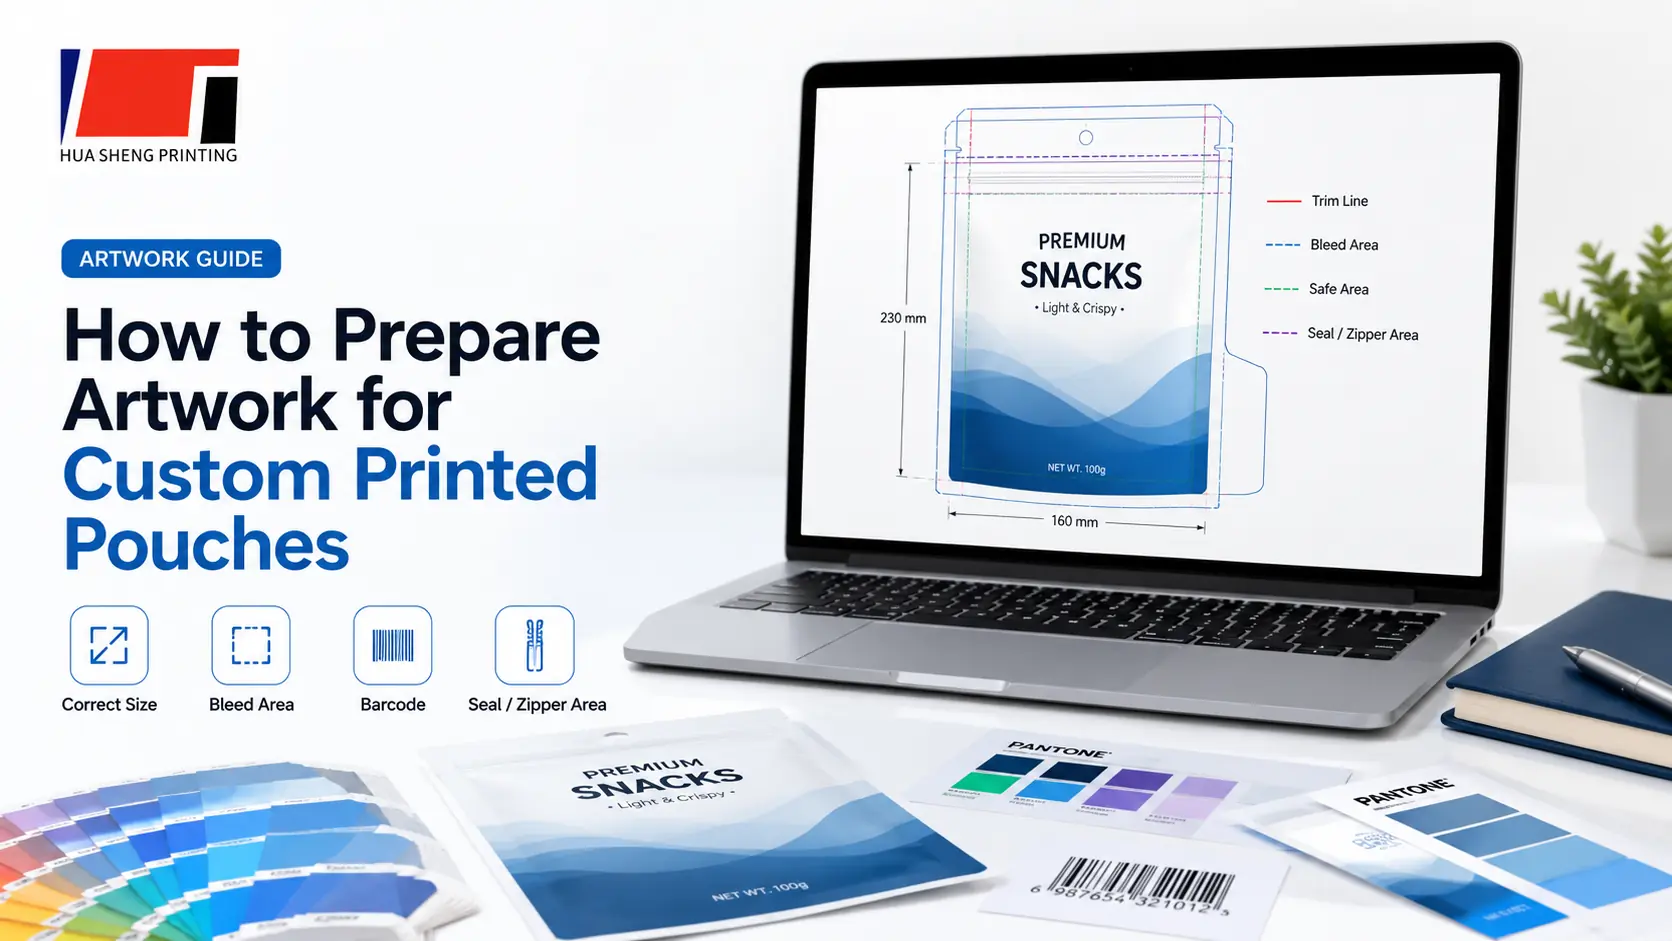
Bleed, Dieline and Safe Area
Bleed is the extra design area extending beyond the final cut line, typically 3 mm on each side. Without bleed, slight cutting variations may leave white edges on the finished pouch. The dieline indicates the final pouch shape, seal areas, and where cuts and folds occur. The safe area is the zone inside the dieline where critical design elements (text, logos, barcodes) must stay — typically 3–5 mm from the dieline edge — to avoid being cut off or covered by seals.
CMYK, Spot Colors and Printing Color Control
Flexible packaging is printed in CMYK color mode, not RGB. RGB files must be converted to CMYK before printing, and this conversion may shift certain colors — especially bright blues, greens and oranges. If your brand uses specific Pantone colors, inform the supplier so spot color matching can be arranged. Each printing color in gravure requires a separate engraved cylinder, so the number of colors directly affects cylinder cost and setup time.
Barcode, Small Text and Regulatory Information
Barcodes must meet minimum size requirements and have sufficient contrast against the background. A barcode that is too small, has low contrast, or is placed across a seal area may fail to scan. Small regulatory text (ingredients, nutrition facts, warnings) must remain legible at actual print size — avoid fonts smaller than 6 pt in most cases. Text placed too close to seal areas or the dieline edge may be partially covered or cut off.
Gravure Printing and Cylinder Preparation
Gravure printing uses engraved metal cylinders — one per printing color — to transfer ink onto the packaging film. After artwork is approved, the prepress team separates the design into individual color channels, and each channel is engraved onto a cylinder. Cylinder engraving typically takes 3–5 working days. Once engraved, cylinders are stored for reuse on repeat orders. Any design change after engraving requires new or modified cylinders.
Final Artwork Confirmation Before Production
Before production begins, the supplier provides a digital proof or mockup showing how the design will appear on the actual pouch or roll film dimensions. The buyer should review: correct dimensions, bleed and dieline alignment, color expectations (noting that screen colors differ from print colors), text and barcode placement, seal areas, and eye mark position for roll film. Confirming these details prevents costly production errors.
Practical Buying Checklist
- Use AI, PDF, PSD or CDR file format
- Convert all text to outlines (curves)
- Set color mode to CMYK (not RGB)
- Include 3 mm bleed on all sides extending beyond the dieline
- Place critical elements within the safe area (3–5 mm from dieline)
- Ensure barcode meets minimum size and contrast requirements
- Use minimum 300 dpi resolution for embedded images
- Confirm the final artwork version before cylinder engraving
- Specify eye mark type and position for roll film
- Provide Pantone references if brand colors must match precisely
Related Products
Related Packaging Guides
Frequently Asked Questions
What file formats are accepted for artwork?
Accepted formats include AI (Adobe Illustrator), PDF, PSD (Photoshop), and CDR (CorelDRAW). All text should be converted to outlines, and the color mode should be CMYK with at least 300 dpi resolution.
Why do I need to add bleed to my artwork?
Bleed (typically 3 mm) provides a margin for cutting variations during pouch making. Without bleed, slight cutting misalignment may leave white edges on the finished pouch. The dieline shows where cuts and seals occur.
What happens if I submit RGB artwork?
RGB files must be converted to CMYK before printing. This conversion can shift colors — especially bright blues, greens and oranges. It is better to design in CMYK from the start to see accurate color representation.
Can I make changes after cylinder engraving?
Changes after engraving require new or modified cylinders, which adds cost and delays production. It is important to review and confirm the final artwork proof carefully before engraving begins.